***Connectors are limited to some of our technology partners. If you would like to connect your system to your Dialog Insight project, our team can provide a solution that fits your needs and data structure.***
Connectors are used to connect data from your system to a Dialog Insight project using the Web Services Connector.MergeObject endpoint from the web services. For the data destination, you can use the standard Dialog Insight e-commerce structure or a custom structure.
In this article, you will see how to set up the necessary structure for the connection using an example in which we will connect data from a contact list AND a transaction list.
Step 1: Create the Destination for Contacts
In Dialog Insight, start by creating a project which will be used to receive and host your contact list: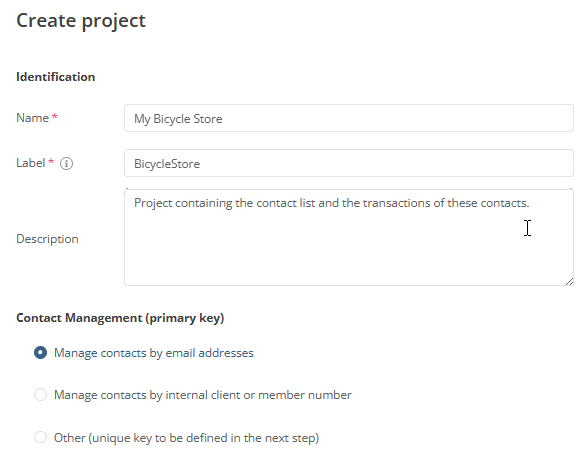
For the example presented in this article, we will use the email as the primary key. However, you could use another type of key to manage contacts.
You could also have a multi-project structure (CDP) for advanced contact management.
→ Learn more about the CDP structure
Depending on the data structure you want to import from your system, you could add missing fields in your project or modify existing fields and adapt them to your case.
→ See How to Create or Edit Fields
To consult the lists of fields generated when creating a project, go to Project → Data Management → Project Fields.
Step 2: Create the Destination for Transactions
To receive data from your transactions, you must create a table which will host your transactions in Dialog Insight. You have 2 options for this table.
Under the list of project fields (created in step 1), you can activate this structure with the Create my Data Structures.
For more details, consult Creating a Project with E-commerce Structure.→ See How To Create a Custom Table
Examples of fields for a transaction table | |
| TransactionID (NVarChar ou Int) | This is the transaction number or code which identifies each transaction. It is the primary key of the table. |
| Email (NVarChar) | It is a foreign key that identifies the contact who made the transaction with the email (linked to the email field from the project). |
| Price (decimal) | Price of the item. |
Step 3: Add Transformation Scripts
Transformation scripts will convert the data received in the endpoint (Connector.MergeObject) before sending it to the contact list or transaction table. Most of the time, our team will provide you with a transformation script during the initial support. However, you could create the script by yourself or modify an existing one, so we will explain how to.
Create or edit a transformation script
Go to Project → Data Management and, under Integrations, click Advanced Configurations:
Go to the Scripts section. If you want to create or add a new script, click Create.
To add content to a script (already existing or one you just created), click Consult at the end of the line of that script.
In the editor, add the scripts (see the examples a little lower):
After adding the script, click Save and Publish to production. Go back to the list of scripts and create another one for transactions.
Transformation scripts examples
These scripts are examples to adapt to your case.
// Transformation script example for Contact
datasource contacts = context.Payload;
datasource contactListUpdater = System.Operations.ContactListUpdaters.GetCurrent();
datasource mapping = System.Operations.Mappings.Get(contactListUpdater, "ContactMapping");

foreach (contact in contacts)
{
    datasource contactDataSource = system.SourceHelper.CreateCollection();

    // Contact Fields
    contactDataSource.SetValue("email", contact.email);
    contactDataSource.SetValue("firstName", contact.firstName);
    contactDataSource.SetValue("lastName", contact.lastName);
    contactDataSource.SetValue("address", contact.address);
    contactDataSource.SetValue("app", contact.appartment_number);
    contactDataSource.SetValue("city", contact.city);
    contactDataSource.SetValue("province", contact.province);
    contactDataSource.SetValue("country", contact.country);
    contactDataSource.SetValue("postalcode", contact.postal_code);
    contactDataSource.SetValue("phone", contact.home_phone);
    contactDataSource.SetValue("mobile", contact.mobile_phone);

    // Mapping processing and data loading
    datasource mappedContact = mapping.MapWithMappingBase(contactDataSource);
    contactListUpdater.Merge(mappedContact);
} |
// Transformation script example for Transaction (the standard table in Dialog Insight)
datasource transactionPayload = context.Payload;

datasource transactionUpdater = System.Operations.RelationalTableUpdaters.GetByCode("ECommerce_Transaction");
datasource mapping = System.Operations.Mappings.Get(transactionUpdater, "TransactionMapping");

foreach (trx in transactionPayload)
{
    datasource trxDataSource = system.SourceHelper.CreateCollection();

    trxDataSource.SetValue("id", trx.id);
    trxDataSource.SetValue("email", trx.email);
    trxDataSource.SetValue("status", trx.status);
    trxDataSource.SetValue("price", trx.price);

    // Mapping processing and data loadi
    datasource mappedtrx = mapping.MapWithMappingBase(trxDataSource);
    transactionUpdater.Merge(mappedtrx);
} |
Step 4: Create the Mappings
Go to Project → Data Management, and, under Integrations, click Advanced Configurations.
In the Mappings section, you must add a mapping for contacts AND another for transactions:
Example of mapping for Contact Legend
Step 5: Add the MergeObjectHandlers
Go to the MergeObjectHandlers (MOH) management page by using this URL:
https://app.dialoginsight.com/fe/ofc4/mergeobject
In this interface, add a MOH for Contact AND another for Transaction :
Step 6: Test the Connection
You can now test if your connection works by going to one of these two platforms:
Canada: https://app.dialoginsight.com/webservices/
France: https://app.mydialoginsight.com/webservices/

Authentication
Prior to authenticating in the AuthKey part, you must:
- Create a web services key
- Verify that you have one of the following permissions:
- All services
- Connector
- Connecter.MergeObject
→ Learn more about the authentication
// Sample to test the connection for transactions
{
"AuthKey": {
 "idKey": 5335,
 "Key": "abcdefghijklmnopkrstuvwxyz"
 },
 "idProject": 11111,
 "objectCommand": Transaction/Update,
 "Data":
 [
     {
     "id": "TX-1001",
     "email": "jeandupont@dialoginsight.com",
     "status": 1,
     "price": 18.25
     },
     {
     "id": "TX-1002",
     "email": "jeffduval@dialoginsight.com",
     "status": 2,
     "price": 15.50
     }
 ]
} |